

This video outlines EVERYTHING you'll need to launch, in order.
⬅️ However, if you're more of a step-by-step person, feel free to work your way down the Launch Guide Dropdown Menu to the left.
Welcome To Jedari!
We're so excited to help you launch your custom community. Here's some quick first steps you can take:
Step 1: Grab Your Copy Of Our Master Community Launch Checklist 🚀💻
Make a copy of it and follow along as you go.
- File → Make a copy
- Check out the tabs for additional helpful information
If you are an app client, check out our App Checklist here.
Step 2: Check Out The Community Graphics Guide Here 🎨📲 🖥️
Save it for later. It has all of the dimensions you'll need for your graphics, plus it will help you visualize your community.

Step 3: Bookmark the Help Center & The Jedari Admin Portal
Help Center: help.jedari.com
Hint: You're here! Click star to save this page so you can always come back to it. Everything you need to know to launch is in our Community Launch Guide section, in order.
Admin Portal: portal.jedari.com
This is your community control panel, where you can change your settings, add your branding and your content, connect your domain, and more!
Make sure to validate your email address so you can log in! If you have any issues logging in, email us at welcome@jedari.com.
Read on - More steps below!
Client Onboarding Support
We've Got Your Back!
In addition to our fully built help center with tutorials on every topic, you will also have opportunities for live calls with a Jedari expert.
Part 1: Domain Connection
- The first step? Connect your domain, so we can see your community live. If you need assistance with this process, feel free to Book A Call with our team if you haven't already
Part 2: Community Setup
- Once your site is live, our team will be able to help you complete the setup for your white-labeled private community, according to your rules. You'll be ready to launch in no time!
How To Contact The Jedari Team
For questions or assistance, you can always start a chat with Jed for quick answers, email welcome@jedari.com, Submit A Help Ticket right here in our help center, or Book A Call if you want help from a human.
Premium Services Available Exclusively For Jedari Clients

Want to save time and get help launching your community from the pros? Our team of experts can assist with all of the graphics for your community, creating your public sales website, email copywriting and marketing automations, and so much more.
See our available Service Packages here.
Join Jedarian: Our Client Community

Available only to Jedari clients, here's what you will receive by joining:
- Build connections with the Jedari team and fellow community builders
- Direct Support & help in building your epic community
- Complimentary Templates & Resources for graphics, emails, and more
- Watch Exclusive Courses on topics like Creating Content with AI, Marketing, Sales, and Community Building
- Join Groups on every topic from Tips & Tricks to Sales & Marketing
- Daily Goals targeted to helping you build your community effectively
- Guided Meditations created by our CEO to level up your life... and more!
Sign up for Jedarian!
- Sign up here: jedarian.com/register
- Download the Jedarian app for easy access
GETTING STARTED GUIDE
How To Get Started
- Resources: Check out the Community Launch Checklist & Graphics Guide
- Admin Portal: Bookmark the Jedari Admin Portal & watch the quick tour
- Domain: Select & connect your domain so you can see your community live for the first time!
- Settings: Initial configuration of your community settings (Communities → Edit)
- Users: Add your user profile so you can log in (Communities → Open Panel → Users)
- Content: Start compiling your community assets so you can complete your setup! (Below)
Community Assets & Content
Here is an overview of the key elements you'll need to launch: Domain, Support Email, Payment Gateway, Graphics & Content
1. YOUR COMMUNITY DOMAIN

The first - and most important - step is selecting and connecting your domain so we can see your site live!
Step 1: Choose A Domain That Matches Your Community Name
Choosing the right name for your community sets you up for success. While you're at it, it's a good idea to check if the matching website domain is available.
- Don't have an idea yet? That's okay, let's get your site live so we can complete our setup. You can always change it later!
💻 Best Practice: 2 Domains 💻

One for your community, and one for your external website/landing page to drive sales.
- External Sales Website: A public website/landing page that will explain the value of joining & drive sales
- Jedari Community Website: Your own private social platform that lives behind a login wall
You can't have the same domain for both, because connecting your community would override your existing website.
- External Sales Website Example: lionsnotsheepcoaching.com
- Jedari Community Website Example: lionsnotsheepden.com

Step 2: Purchase Your Domain
- Recommendation: To purchase your domain, we recommend Namecheap.com as the most cost-effective option, but you can purchase your domain anywhere.
Step 3: Connect Your Domain To Jedari
- In portal.jedari.com/domains, just hit the 'Add' button and complete the setup via Entri
- Full Domain Tutorial

2. YOUR BRANDED SUPPORT EMAIL
This is optional, but it's a good idea to have a dedicated, branded support email to send verification emails, connect with your community members, and keep things professional.
- Our default email sender is support@jedari.com, but we can connect a custom email for your community.
- Your custom email sender has to match your community domain in order to be CAN-SPAM compliant.
Community Domain Examples:
- lionsnotsheepden.com
- mycommunity.com
Support Email Example:
- support@lionsnotsheep.com
- support@mycommunity.com
Set Up Your Support Email 📤
- You can create an email inbox for your domain through Google Workspace or Outlook.
- Our comprehensive tutorial provides a step-by-step guide to help you navigate the process with ease.
3. MONETIZATION STRATEGY
Turning Passion Into Profit 💰
.webp)
With our automated billing features, you can transform your community into a scalable, revenue-generating asset.
- Membership Pricing: What will you charge for membership?
- Membership Tiers: Will you have different membership levels?
- Automatic Upsells: We can create exclusive gated groups, pages, and audio albums to specific subscription levels.
GATEWAY
Create & Connect Your Stripe Account

We integrate with stripe in just a couple of clicks, so you can get paid effortlessly.
- Create your Stripe Account if you don't already have one
- Connect your Stripe account so we can add Membership Plans
Learn more about monetizing your community here.
4. COMMUNITY CONTENT
Adding Content
It's important to populate your network with content so people aren't joining an empty space. Oftentimes, the members of an online group behave the way they see others engaging. So if your community has no content, no one else will want to be the first to post. If you have content and created posts encouraging engagement, many people will react to your prompts with engagement and you'll build a thriving, successful community. It's also important to test things out as you go.
BRAND GRAPHICS
For all required graphics and dimensions:
GROUPS + GRAPHICS

Create Groups For Dedicated Discussions
- Create unlimited groups within your community for targeted discussions, and decide who can join, post, and comment. Control group access via membership plans.
- Example: Live Calls Group, where you're the only one who can post, so users can easily find all of your live calls.
So, start brainstorming the groups you will want in your community.
DAILY GOALS

Create Gamified Daily Goals
Boost community engagement with Daily Goals.
Example: Our daily goals at Jedari

Go ahead and brainstorm Categories & Daily Goals for your community.
CONTENT LIBRARIES (STATIC PAGES)

Create Pages For Dedicated Content Libraries
Create dedicated pages for valuable content like video libraries, courses, guides, or articles.
- You can add our End User Support Guide as a Static Page.
- You can even create gated pages locked behind a paywall that require a membership upgrade for more premium content.
Ideas & Structure Of Static Pages:

Use this outline to start organizing your content for Static Pages.
AUDIO PLAYER
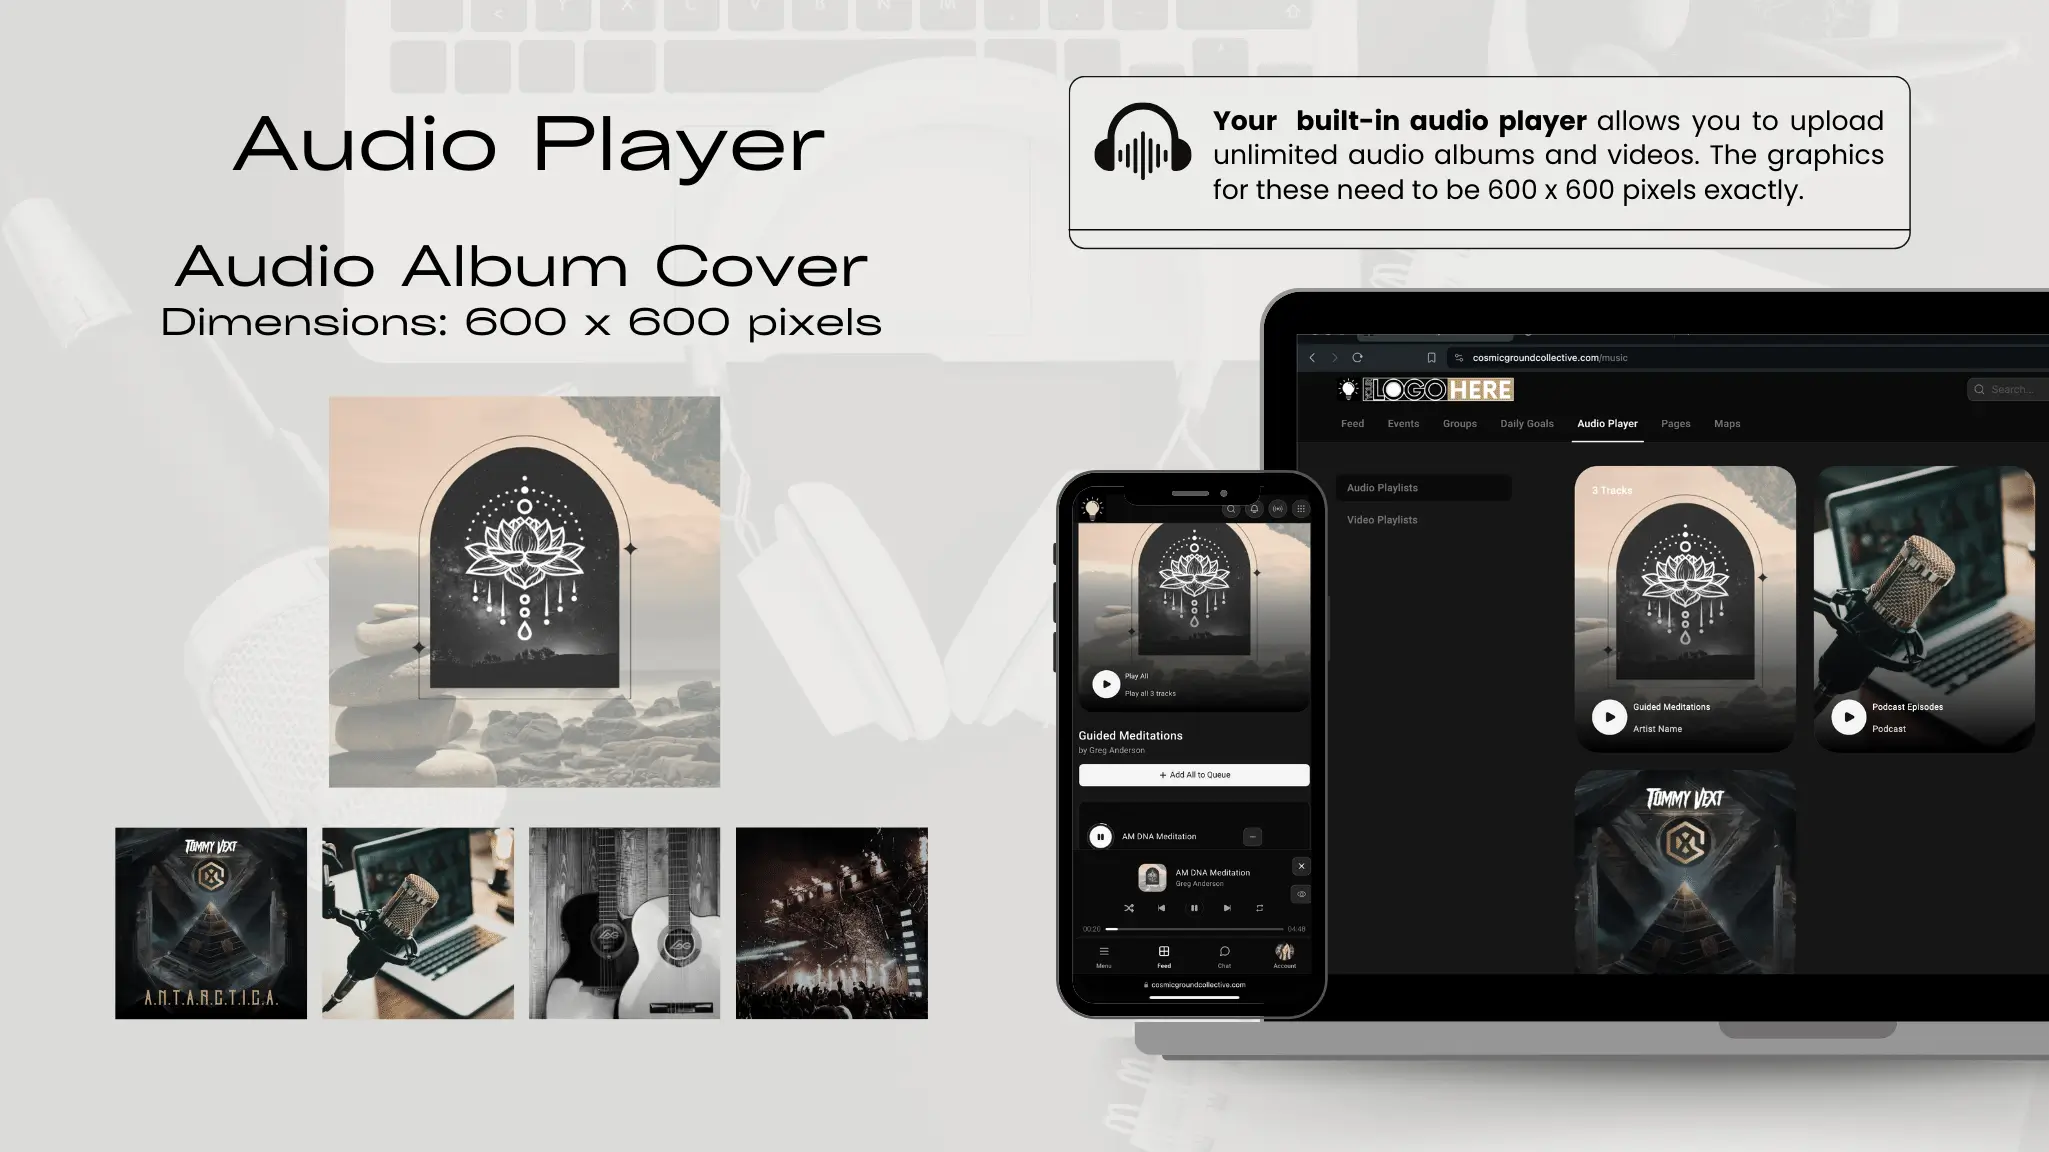
Compile audio content for your community, like:
- Podcast Episodes
- Music
- Guided Meditations
That's all for now!
Up next?


