

Your support email will need to match your community domain.
Example domain: mycommunity.com
Example email sender: support@mycommunity.com
UPDATE: Email Sender DNS Records Are Now Added In The Domain Connection Process, So You Won't Need To Add Them Manually.
Watch These Chapters:
- Add Your Email Sender (05:29)
- Verify Your Email (08:00)
How To Add Your Email Sender:
Your Email Sender will send verification emails to all of your new registering community members on your behalf. Our default email sender is support@jedari.com, but that can be changed by following these steps:
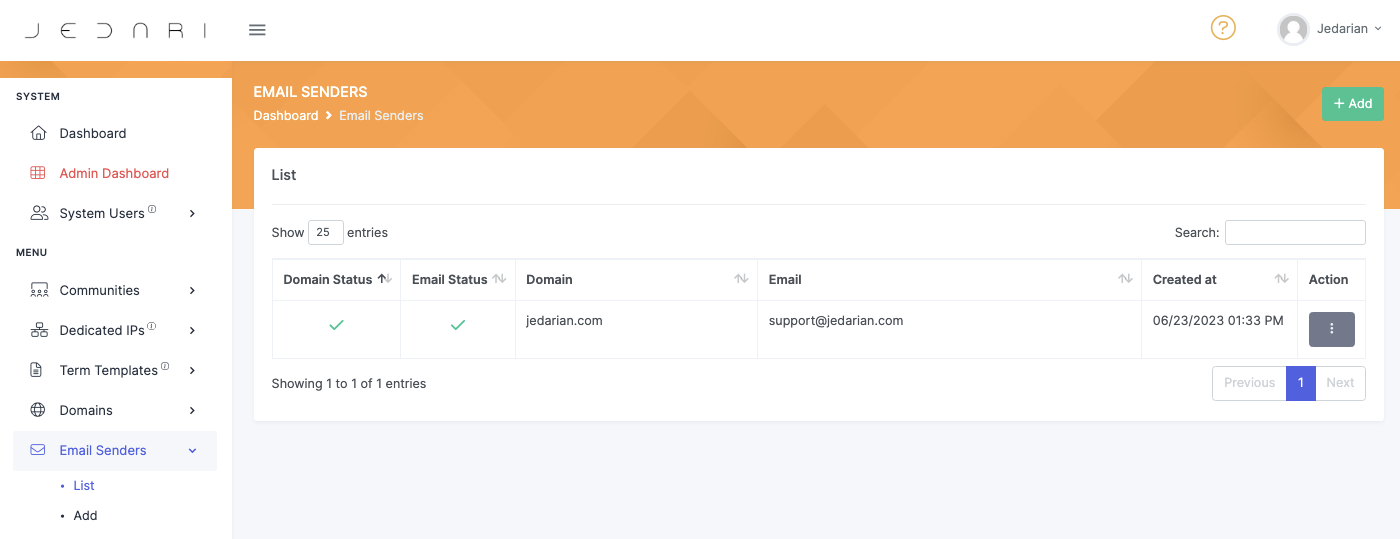
- Login to your account on portal.jedari.com
- Head to Email Senders → List → Add
- Enter your support email & mailing address & hit Submit
- Press Send Verification Email & verify your email
- Hit Verify Now
What Are Email Senders?
When a new user registers for your community, they will receive an email like this:
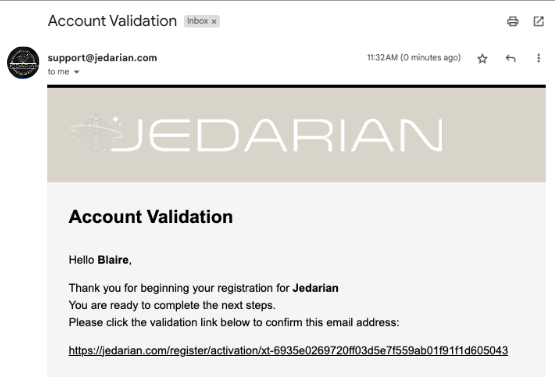
- All of your new users will have to verify their email before they can log in to your community, on web or app.
Click here to check out our help article on our Community Registration Process.
Fully White-Label Your Community
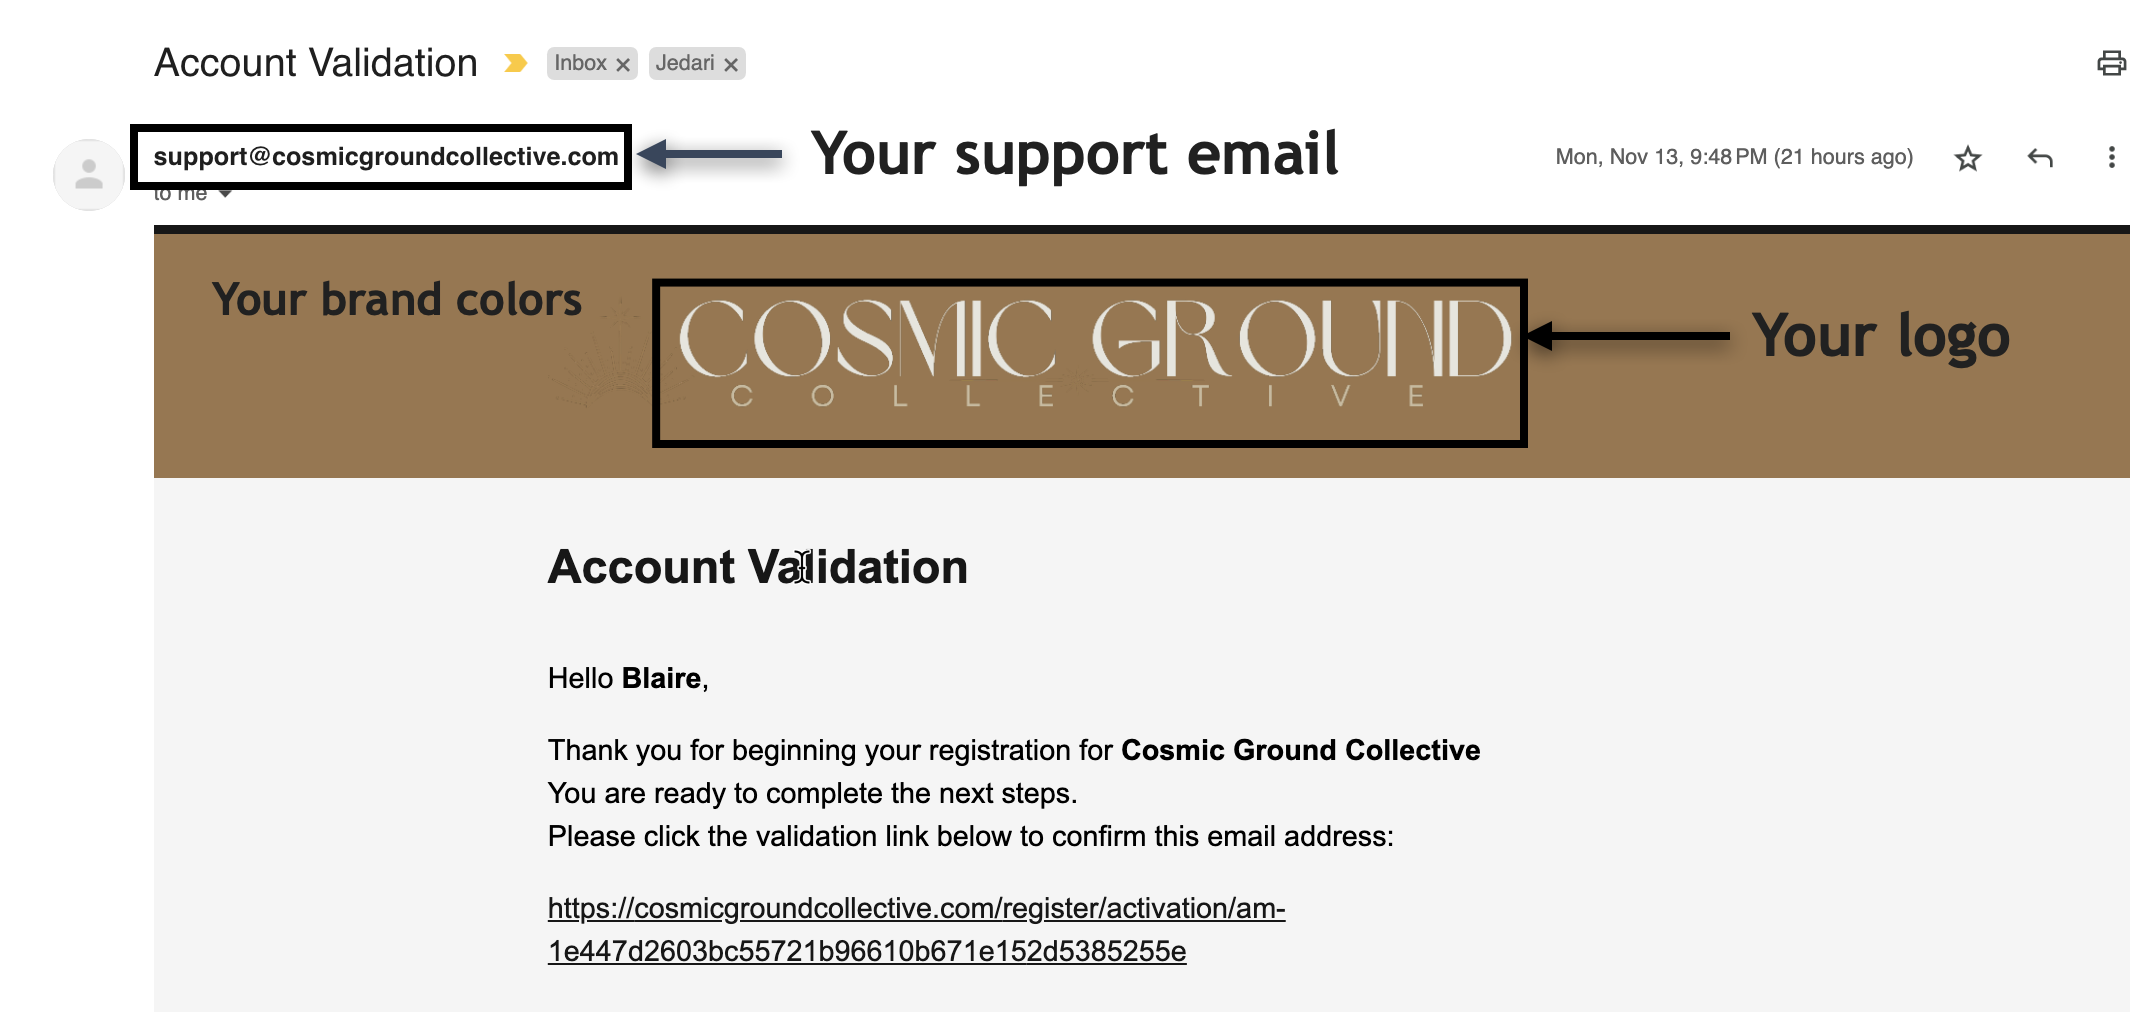
- By default, our email sender is support@jedari.com, so if you want to fully-white label your platform and provide a seamless onboarding flow, you will want to set up & connect your branded support email.

Step 1: Create A Support Email Address That Matches Your Community Domain
- If your community domain is mysocial.com, then you will need an email like support@mysocial.com in order to connect your email senders.
- If you already have a matching email inbox, skip to How To Add Your Email Sender In Jedari
.png)
How To Set Up Your Support Email
To fully white-label your community, you'll want to set up a branded support email address that is attached to your domain. This will make your verification emails come from your community domain, giving it that professional touch.
CAN-SPAM Laws require that your email sender's domain matches your community domain and is tied to your business address.
Option 1: Set Up An Email Inbox - Recommended
- Our best practice? Set up an email account for your domain through Google Workspace or Microsoft Outlook. It's simple, effective, and keeps everything legit.
- Create A Branded Email Account With Google Workspace
- Follow the instructions to enable your domain and add the email (MX) records to your DNS in Cloudflare
OR
Option 2: Email Forwarding with Cloudflare - Free
- Want email forwarding for free? We've got you covered! You can set it up through Cloudflare. Just create a custom email address @yourdomain and route it to your preferred email inbox & follow Cloudflare's setup instructions.
- The drawback of this method is that when you reply, it will come from your existing email address, not the new one you've created.
NOTE: You WILL NOT be able to do both of these. Pick the option that best aligns with your goals.
Step 2: Add Your Email Sender In Jedari's Back Office
- Before you do this, make sure your domain is connected and enabled.
1. Make Sure Your Email Account is Set Up and Working
This sounds simple, but it's pretty important. We usually send a test email to make sure the email address is working properly.
2. Add Your Email Sender in your Jedari Back Office
- Login to your account at portal.jedari.com
- Navigate to your Email Senders List under Menu
- Hit + Add
- Select your domain from the dropdown
- Enter your organization's address
- Enter in the Name you want your support email to come up as in your client's inboxes
- Enter the first part of your email, ie support
- Verify your information and hit save
3. Verify
- First, hit Send Verification Email
- Navigate to your email inbox to verify your email - look for an email that comes from SendGrid
- Make sure that your DNS Settings are added properly to your account
- Hit Verify Email
If you've done this properly, this is what you will see:

4. Tie Your Email Sender To Your Community
Because our backend is built to manage multiple communities, domains, and email senders, we now have to tie the email sender we just created to your corresponding community.
To do this, Navigate to Communities → List → Action → Edit, and click on the Customization page. The email senders setting is towards the bottom of this page. Select your freshly added email sender from the dropdown, then navigate to the last page to submit your new settings.
You Did It - Happy Sending!
Congratulations on completing this important step in building your community. You've set up your email senders like a pro, and now your system is ready to send those verification emails with automatic confidence.
Footnote: More Info On CAN-SPAM Laws
Why Verification Emails Are Important
Imagine a world without verification emails—chaos, right? That's why all major tech companies require them. They help protect your community from charge post backs and keep things running smoothly. So, it's time to make sure your verification emails have a proper sender, and we'll help keep you CAN-SPAM compliant.
CAN-SPAM Laws: Keeping Your Email Marketing Compliant
When it comes to email marketing, staying on the right side of the law is crucial. Enter CAN-SPAM laws—a set of regulations designed to protect recipients from unsolicited and misleading emails. Understanding and complying with these laws is essential to maintain the trust of your audience and avoid potential legal trouble.
What is CAN-SPAM?
CAN-SPAM stands for Controlling the Assault of Non-Solicited Pornography And Marketing Act, a law enacted in the United States to establish rules for commercial email messages. The primary goal of CAN-SPAM is to ensure transparency, honesty, and accountability in email marketing practices.
Key Requirements of CAN-SPAM:
- Don't Mislead Recipients: Your email subject lines and content should accurately represent the nature of the message. Avoid deceptive tactics and misleading information to prevent confusing or misleading recipients.
- Include a Clear Sender and Contact Information: Your email must clearly identify the sender, whether it's an individual or a business. Additionally, you should provide a valid physical mailing address to allow recipients to contact you.
- Provide an Opt-Out Mechanism: Every email you send must include a clear and conspicuous opt-out or unsubscribe mechanism. It should be easy for recipients to unsubscribe from your mailing list and stop receiving future emails from you.
- Honor Opt-Out Requests Promptly: Once a recipient has opted out, you have ten business days to process their request and ensure they no longer receive emails from you. Make sure to promptly remove them from your mailing list.
- Monitor Third-Party Email Marketing: If you hire a third-party service provider to handle your email marketing, you are still responsible for ensuring compliance with CAN-SPAM. Take steps to monitor their activities and ensure they follow the law.
Building A Positive Email Reputation
Complying with CAN-SPAM laws is not just about avoiding legal consequences—it's also about building trust and maintaining a positive reputation with your audience. By following these guidelines, you demonstrate professionalism, respect recipients' preferences, and protect their privacy. This, in turn, fosters better engagement, higher deliverability rates, and a stronger relationship with your subscribers.


